VIRTUAL REALITY HEADSET DESIGN
This design was done for Spect Inc. in collaboration with Braedon Wong The company was looking to design a headset that could read the wearer's breathing and heart rate in real time and feed that information into the visualizations in VR space.
Brainstorming
When we were brainstorming new ideas for the headset, we had a few of restrictions imposed by the company: it needed to work with many phone types, it needed to be manufacturable using only Rev Ithaca and Cornell University’s resources, and all elements had to be integrated into the headset itself (e.g. no sensors could be separate from the headset).
After initial brainstorming, we decided on a headset design containing the following key elements:
Body: The main bulk of the headset. This will contain all the electronics and the lenses.
Phone Door: A hinged door on the front of the headset that holds the phone in place when closed.
Eyepiece: A flexible piece that sits against the user’s face (similar to ski goggles or a scuba mask).
Lens Piece: Holds the individual lenses within the body.
Gear Focusing Mechanism: A wheel the user can turn that will focus/unfocus the lenses.
Heart Rate Sensor
Microphone
Strap
House of Quality
Based on work from previous team members, we have a general idea of what the customer wants. However, more customer research should be a big component of future work on this project. With our limited insights, the following house of quality was constructed to aid in design decisions:
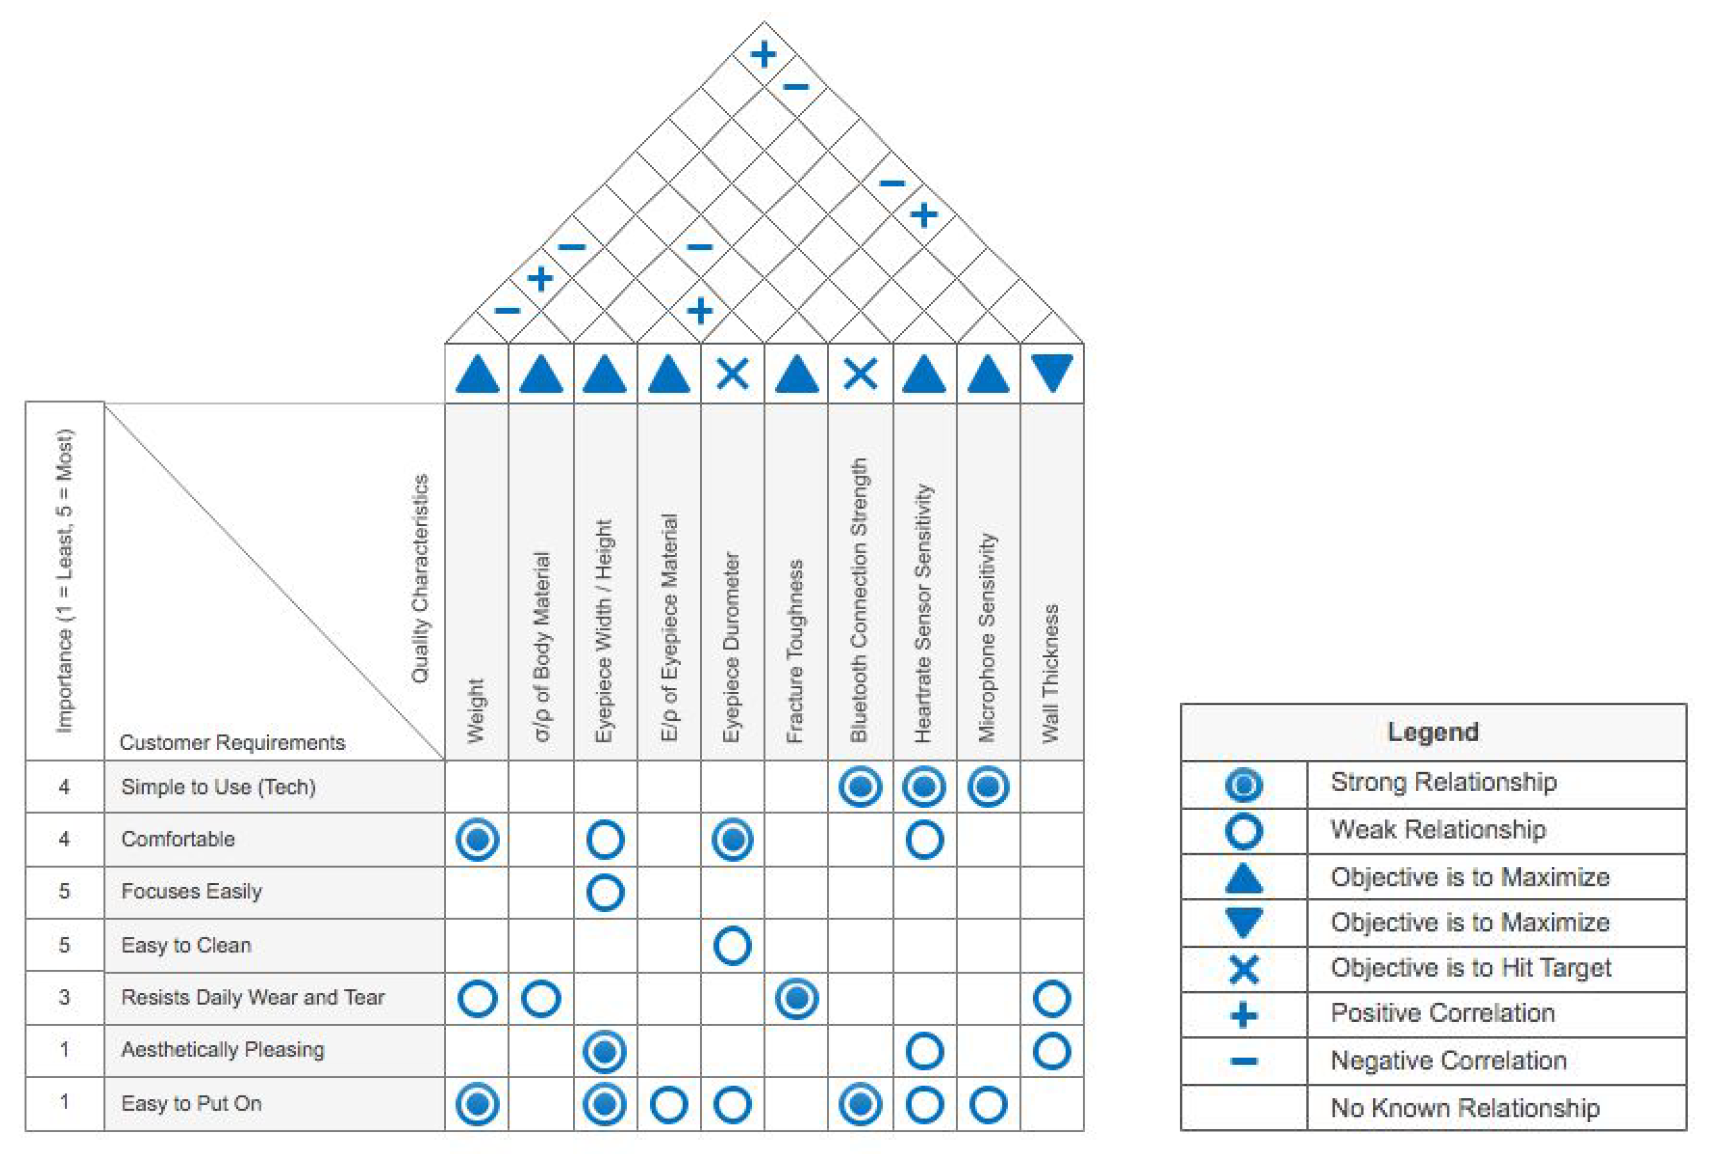
From the House of Quality, we know that it is going to be most important to keep the weight down and make sure the electronics can be easily wired in so that there is no glitching. It is also going to be important for us to make sure the dimensions of the headset and chosen materials allow for our target user of middle and high schoolers to wear it comfortably for long stretches of time.
The target value for the weight we will be using is 1.2 lbs, which comes from the weights of the most popular virtual reality headsets on the market. The Samsung Gear weighs 0.7011 lbs, the Oculus Rift weighs 1.036 lbs, and the HTC Vive weighs 1.2 lbs.
Key Design Decisions
Focusing Mechanism - Current products on market are able to synthesize comfort and intuitiveness in their focusing mechanism. This mechanism is required for different users to develop a sharp VR experience. A simple scrolling wheel was valued over the initial summer 2018 of using two handed sliders on the side. Tuning the internal lenses is much finer with a scroll bar on the top of the VR body as compared to the sliders that require additional effort
Microphone Placement - Two principle options were considered for recording respiratory activity, a piezoelectric strip in place to measure the force of respiration and a dedicated microphone. A piezoelectric was eventually determined unviable for initial prototyping due to difficulty in receiving a strong enough signal. Through testing with a detached microphone, an optimal placement for the microphone was found--where both mouth and nose natural breathing was detected. A gooseneck mechanism with the microphone attached at the end was determined to be most practical as using one to find the optimal breathing location is intuitive with instructions in the HUD of the environment.
Heartbeat Sensor Placement - Photo phlethysmography is utilized to record heart rate in the headset. An external pulse meter (finger clipped) was decided to be potentially disqualifying for the intellectual property claim. A number of contact points were considered for the sensor, temple, forehead, nose, etc. Eventually the nose was discovered to record the most reliable data. With a spring assembly it is possible for sensor to be flush against all different types of facial structure.
CAD Design
Body
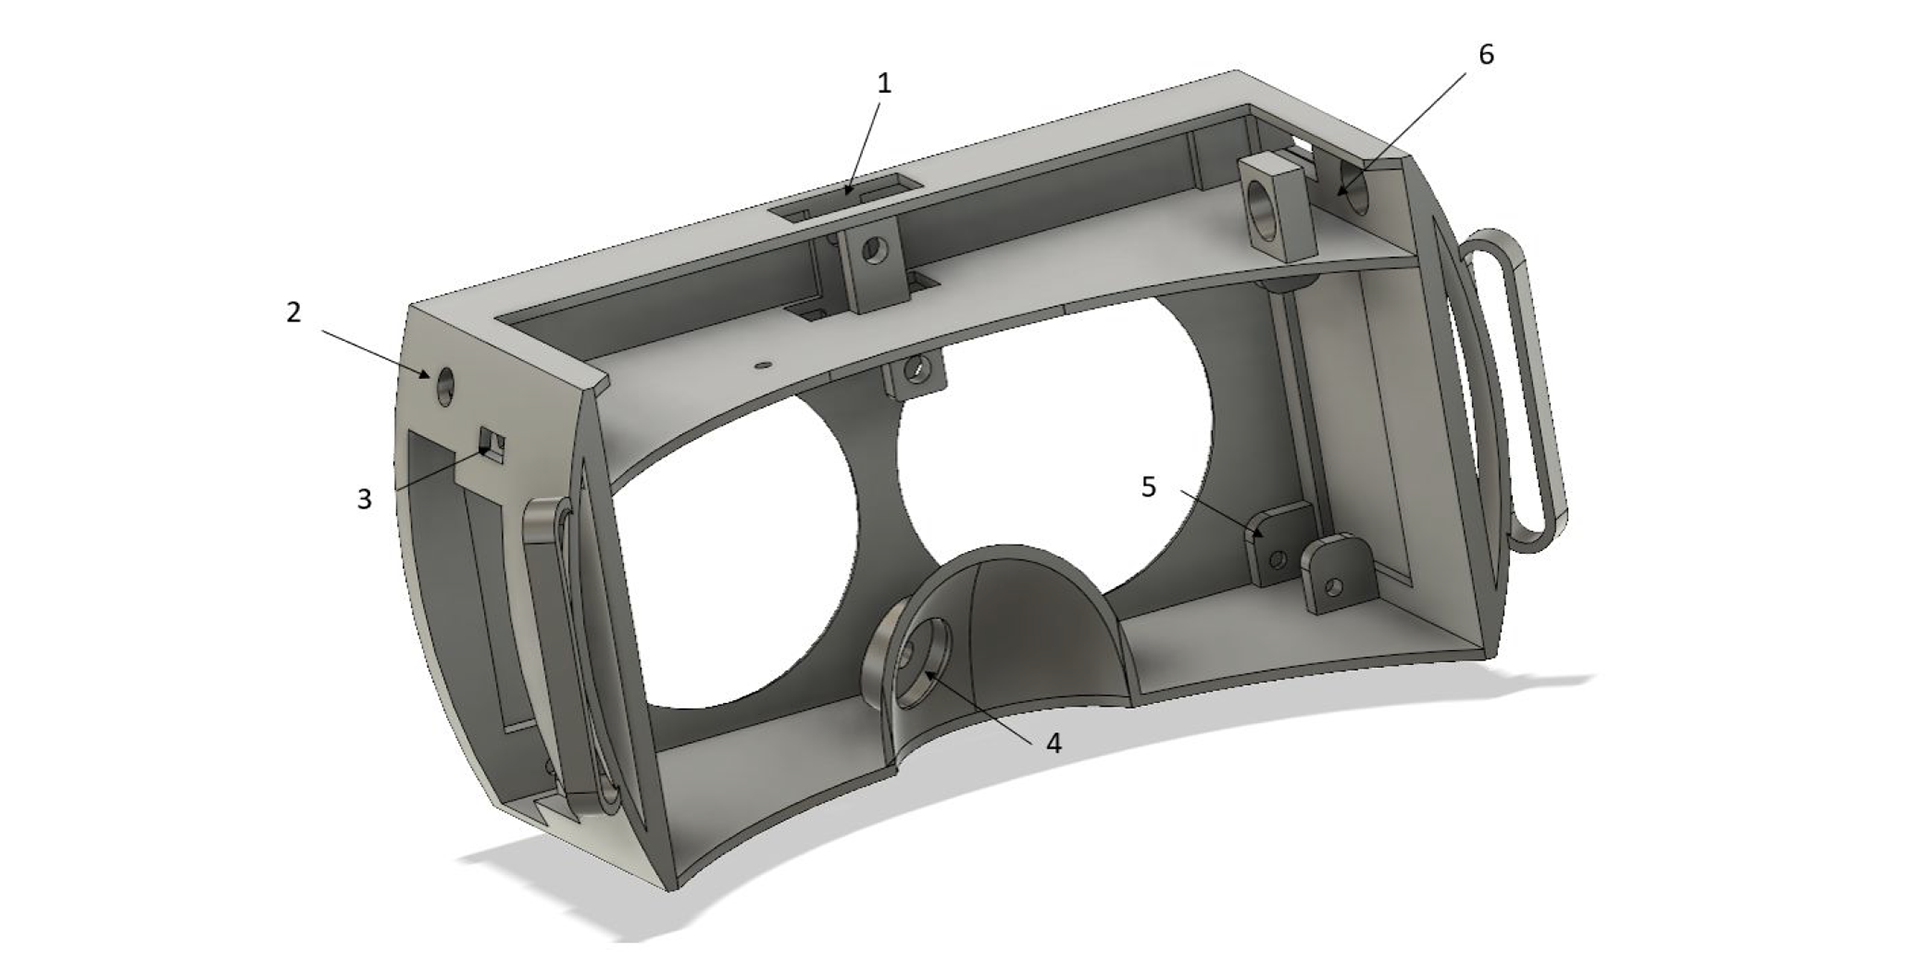
The body of the headset serves as the skeleton and housing for the important components of the VR experience. Those components include all sensors, microcontrollers, and assembly to focus the lens. In future production this body could be made of thinner plastic (either pressed or molded). It was decided that all electronics would sit on a shelf above the viewing window. This decision was made to better distribute the weight of components as they could be alleviated with a top strap. Component placement:
1. Slot for gearing the lenspiece
2. Led indicator
3. Adafruit USB port
4. Space for heartbeat sensor and hole for wiring
5. Holes for lenspiece rails
6. Microphone gooseneck base
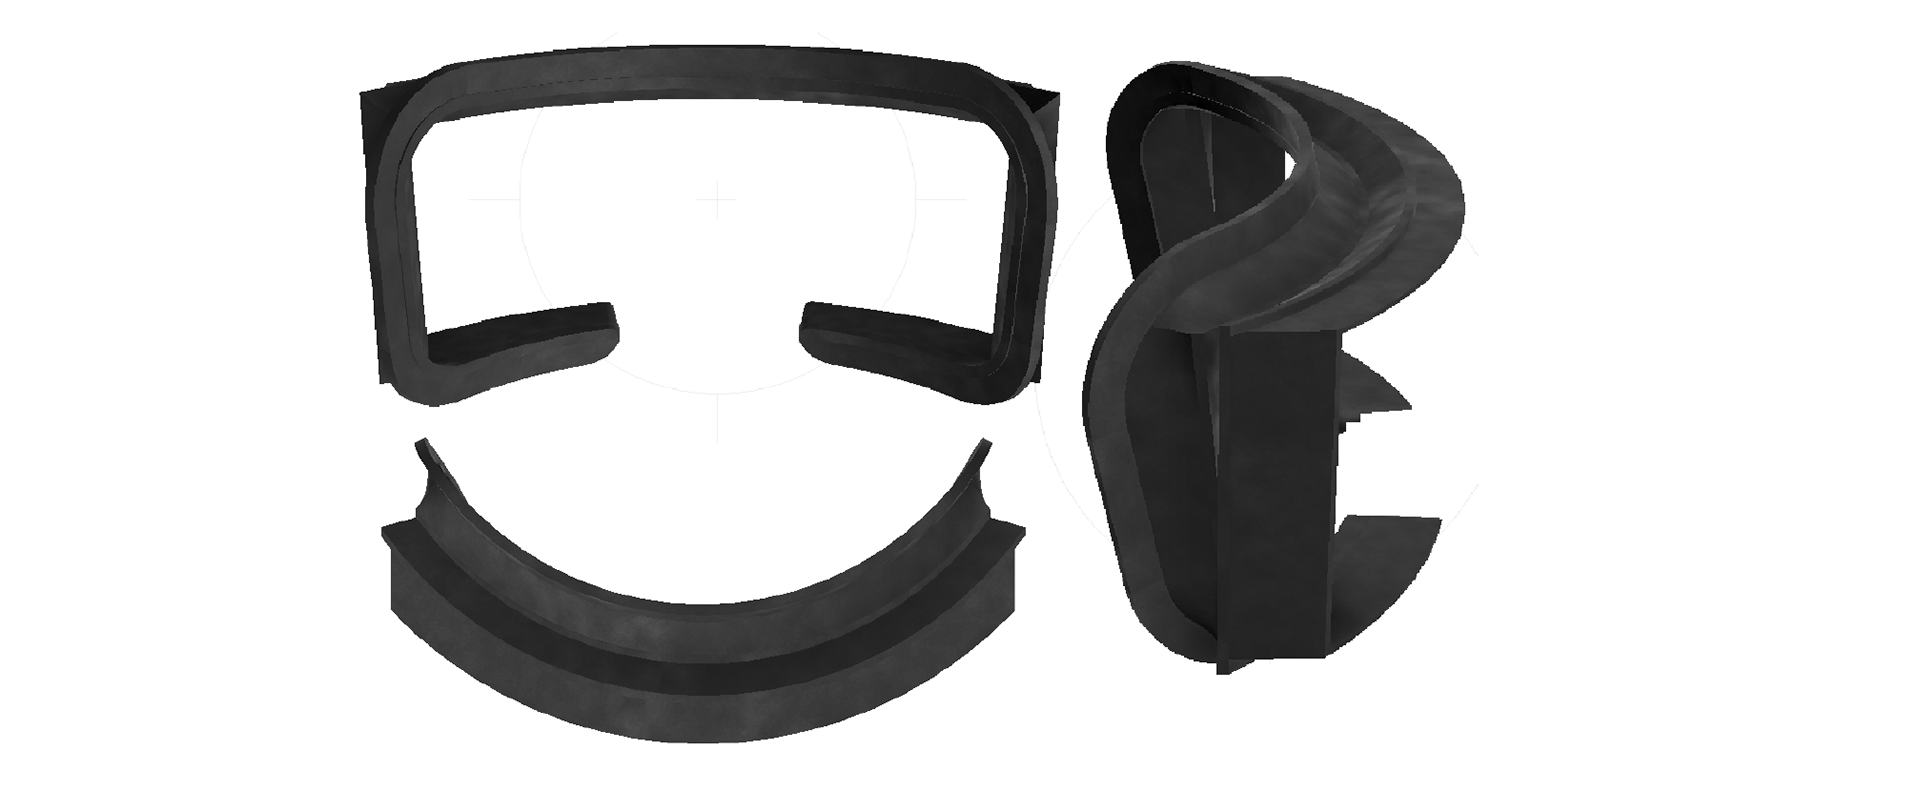
Eyepiece
The idea for the eyepiece was to create a soft, flexible piece that would attach to the body of the headset and provide some cushion for the face. Looking at other popular VR headsets, they all achieve that effect in different ways with different geometries. After trying on a few headsets, the most comfortable headsets (as judged by our small sample size) were the ones using the accordion-like geometry seen on the Samsung Gear.
To emulate that geometry, we defined three levels of the accordion: the side that attaches to the headset body, the side that sits against the face, and a level directly in the middle. The side of the eyepiece that connects to the headset body needs to simply have the exact dimensions of the area of the body where it will be attached. The side that sits against the face will probably need to be adjusted based on user testing, but we started by designing it to the average middle / highschooler’s face.
Companies that sell glasses at standard sizes uses a width of 138.75 mm as their largest glasses width. We used that as our minimum width of the eyepiece against the face, since that seems to be a comfortable eyewear dimension. Looking at the growth charts for teens in our target age demographic, the largest head circumference we need to be designing for is 600mm, and the smallest is 500mm. From those measurements, we set the radius of the curve that sits against the face to be 79.5mm. That way, when the eyepiece is totally unflexed it will sit comfortably against the smallest child in our demographic. We also made sure that the radius of the body/eyepiece connection was 95.5mm so that when the eyepiece is flexed to its limits the headset will fit comfortably against the largest child in our demographic.
With the extreme levels of the eyepiece set, the middle level was defined to have a radius directly between the two (87.5mm) and to be 5mm smaller in width and height. Then, the three shapes were lofted together to achieve the accordion effect, and the entire eyepiece was hollowed out to achieve a wall thickness of 3mm.
(From initial print tests, 3mm was the thickness that gave us the best flexibility. See Fabrication section for more information on printing).
A thin lip was added to the eyepiece that could sit inside the body to connect the two. A rim was also added to the edge where the eyepiece will sit against the face, both for comfort and to make it easy to add a cushion. Lastly, a nose hole was cut in one side.
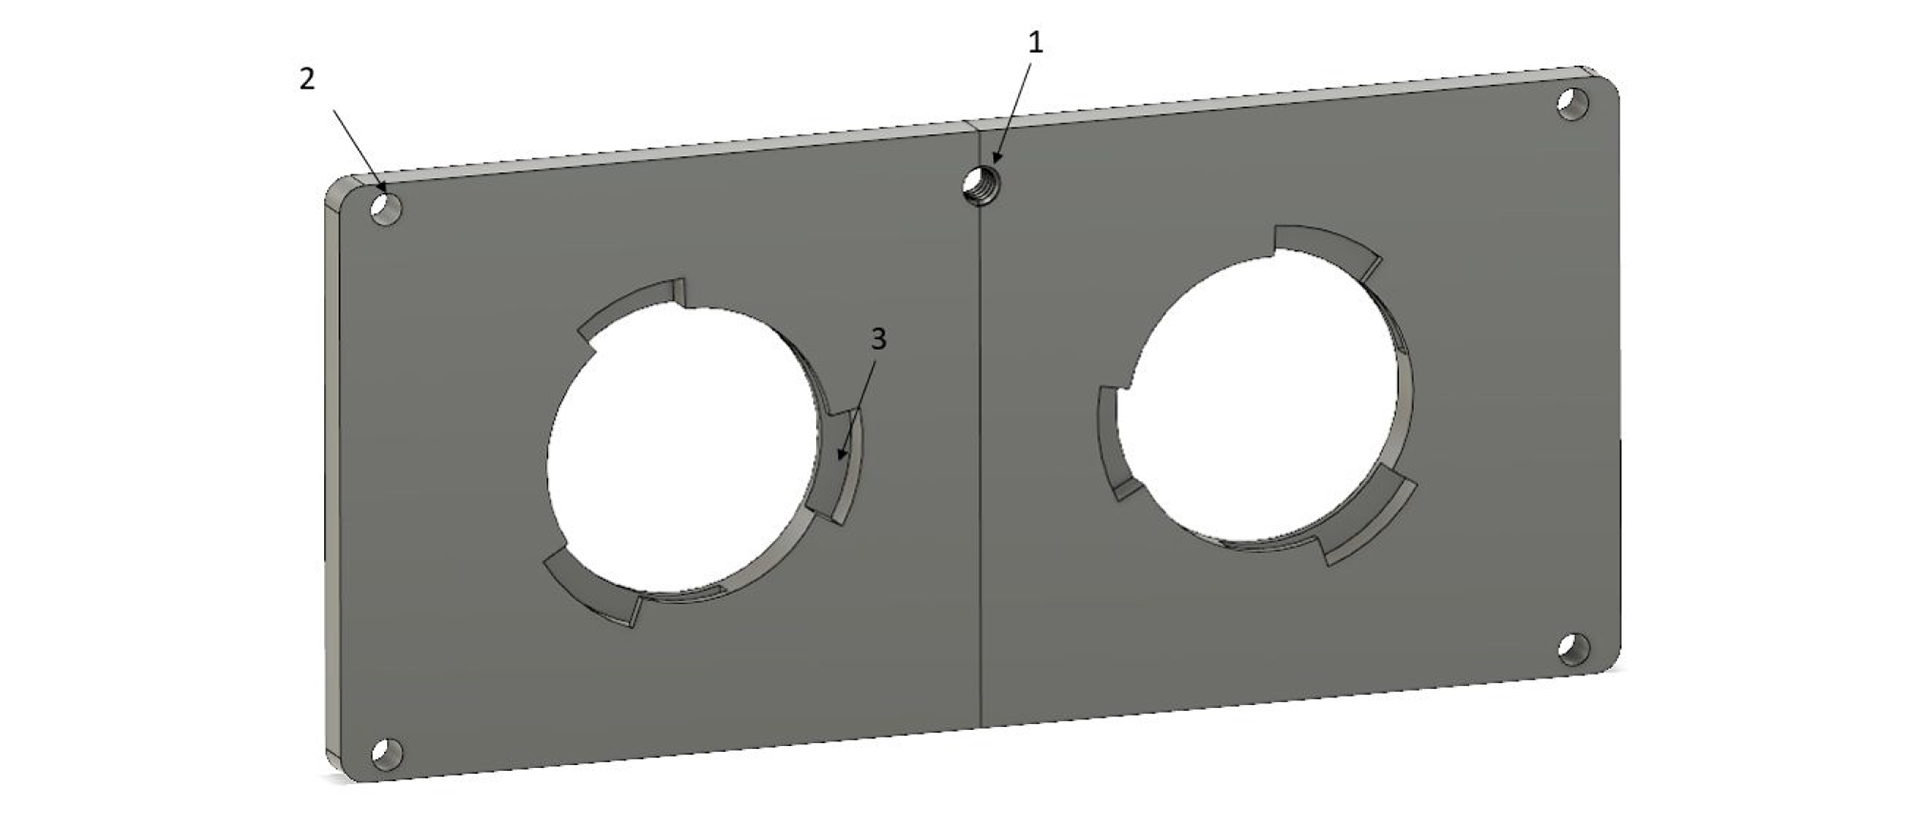
Lenspiece
The lense piece was designed to hold two lenses, one for each eye. With a threaded (1- 10-24UNC) center hole, an external rod could be rotated which would drive the lens piece forward and back. The piece is constrained to forward and backward motion via (2) the four corner holes. Lenses can be easily placed into the piece via the slotted holes (3).
Fabrication
Equipment
FormLabs 2 3D Printer: The FormLabs was ultimately the printer we used for all fabrication. The resin gives really good resolution, allowing for all the parts to fit together seamlessly, and doesn’t warp the parts in any way. It is also able to print both rigid and flexible materials, so it can be used for all printed parts of the headset. One downside to the FormLabs moving forward is that it is more expensive to use than an extruder like the MakerBot. Ideally, we would like to only be using the FormLabs for the flexible eyepiece and have a cheaper option for everything else.
MakerBot Replicator: The MakerBot at Rev was extremely useful for printing test parts, as it is faster and cheaper than the FormLabs. However, since the MakerBot at Rev does not have a heated bed, any larger part like the body piece came out warped no matter how much adhesion was applied to the bed. Ultimately, we did not use the MakerBot for any major prototyping, as the parts were too warped to fit together.
Process
Preform Software: The software package provided with the Form 2 FormLabs 3D Printer is Preform. An STL can be imported directly to Preform where it can be manipulated for optimal printing orientation. It is important to heed the location of supports as despite sanding it is possible to have residual unevenness. A resolution of 0.05mm was used for all prints. All prints must be processed in an IPA bath and post-curing session under UV light:
Materials
At this stage, we are using only materials that are provided by Rev. For all rigid parts (e.g. the body, lens piece) we used FormLabs Form 2 Standard Resin. For the flexible eyepiece, we used FormLabs Form 2 Flexible Resin.
Integration of Electronics
Electronics Being Used
The following electronics were used in this prototype:
● Adafruit Pulse Sensor
● Adafruit Feather M0 Bluefruit LE-
● Adafruit Microphone
● Adafruit’s 2000mAh Lithium Polymer Battery
● DPDT switch
Placement
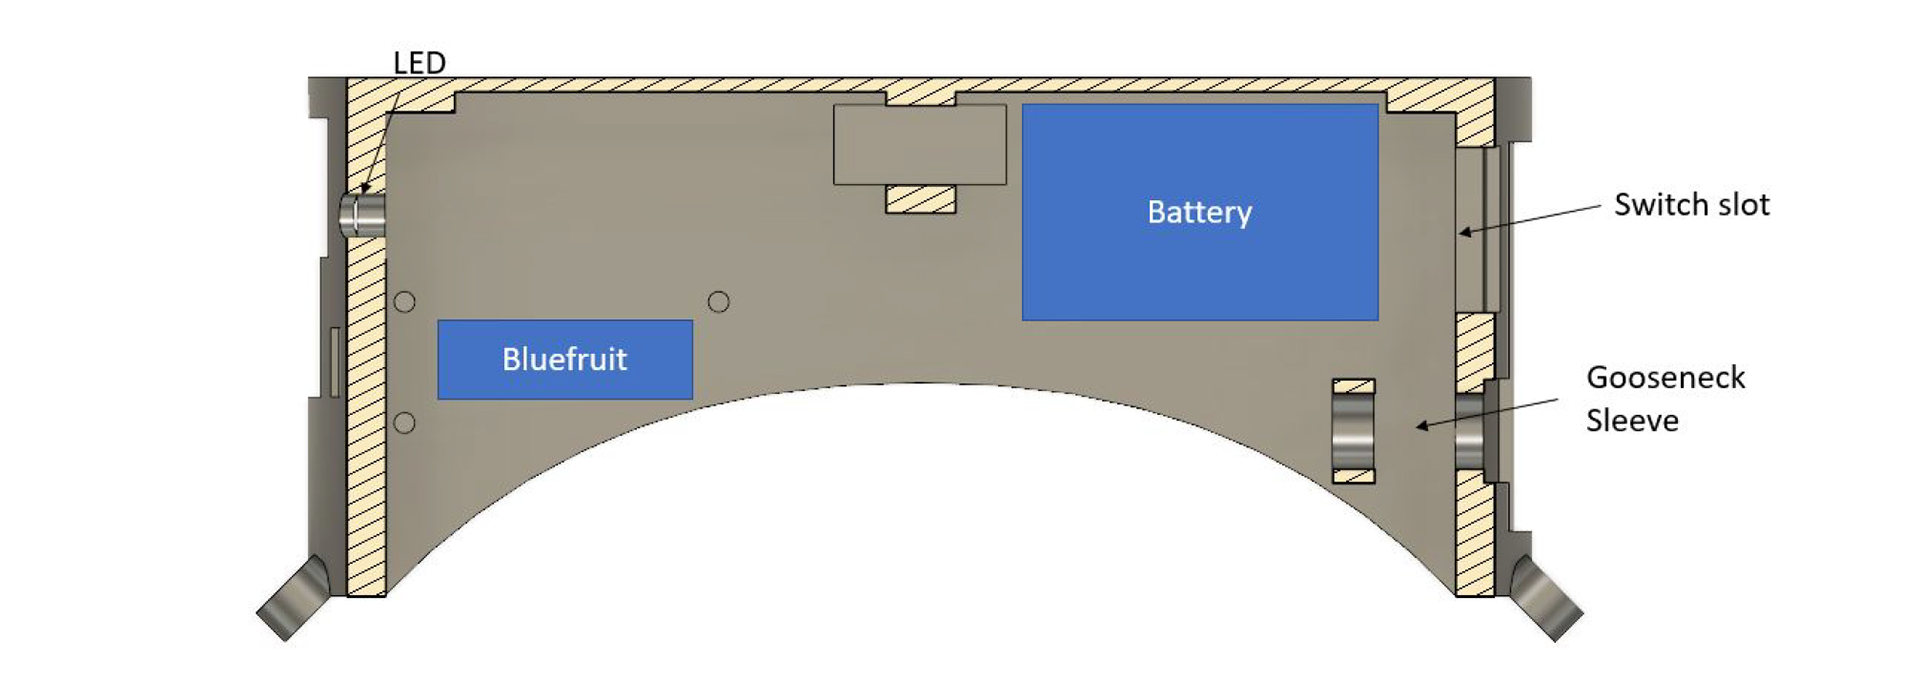
Prototype for Spring 2019
User Flow
The user will first download the Spect app onto their smartphone, and will then be prompted to connect to the headset via bluetooth and plug in their headphones. Once they are connected, the user will start the learning program on the app. They will then put their phone into the front of the headset and close the door, securing the phone. Then the user will put the headset on using the elastic strap, and put on their headphones. The program will prompt them to test the microphone and adjust it if necessary. At that point, the Spect lesson can begin.
Steps for Manufacturing
First, the body piece, door, and lense holder need to be printed. We have found best success using the FormLabs 2 printer in any rigid resin, but these parts can also be extruded with ABS as long as there is a heated bed on the extruder (i.e. Rev’s Makerbot should not be used). The eyepiece should then be printed using the FormLabs 2 in any flexible resin. All formlabs pieces should then be rinsed and cured (following the manufacturer’s instructions). Next, all electronics should be wired together in a circuit and then screwed into the shelf on the body piece (wiring the microphone last, through the gooseneck). The eyepiece and door can then be attached to the body. Lastly, the elastic strap can be added, as well as the optional face cushion.
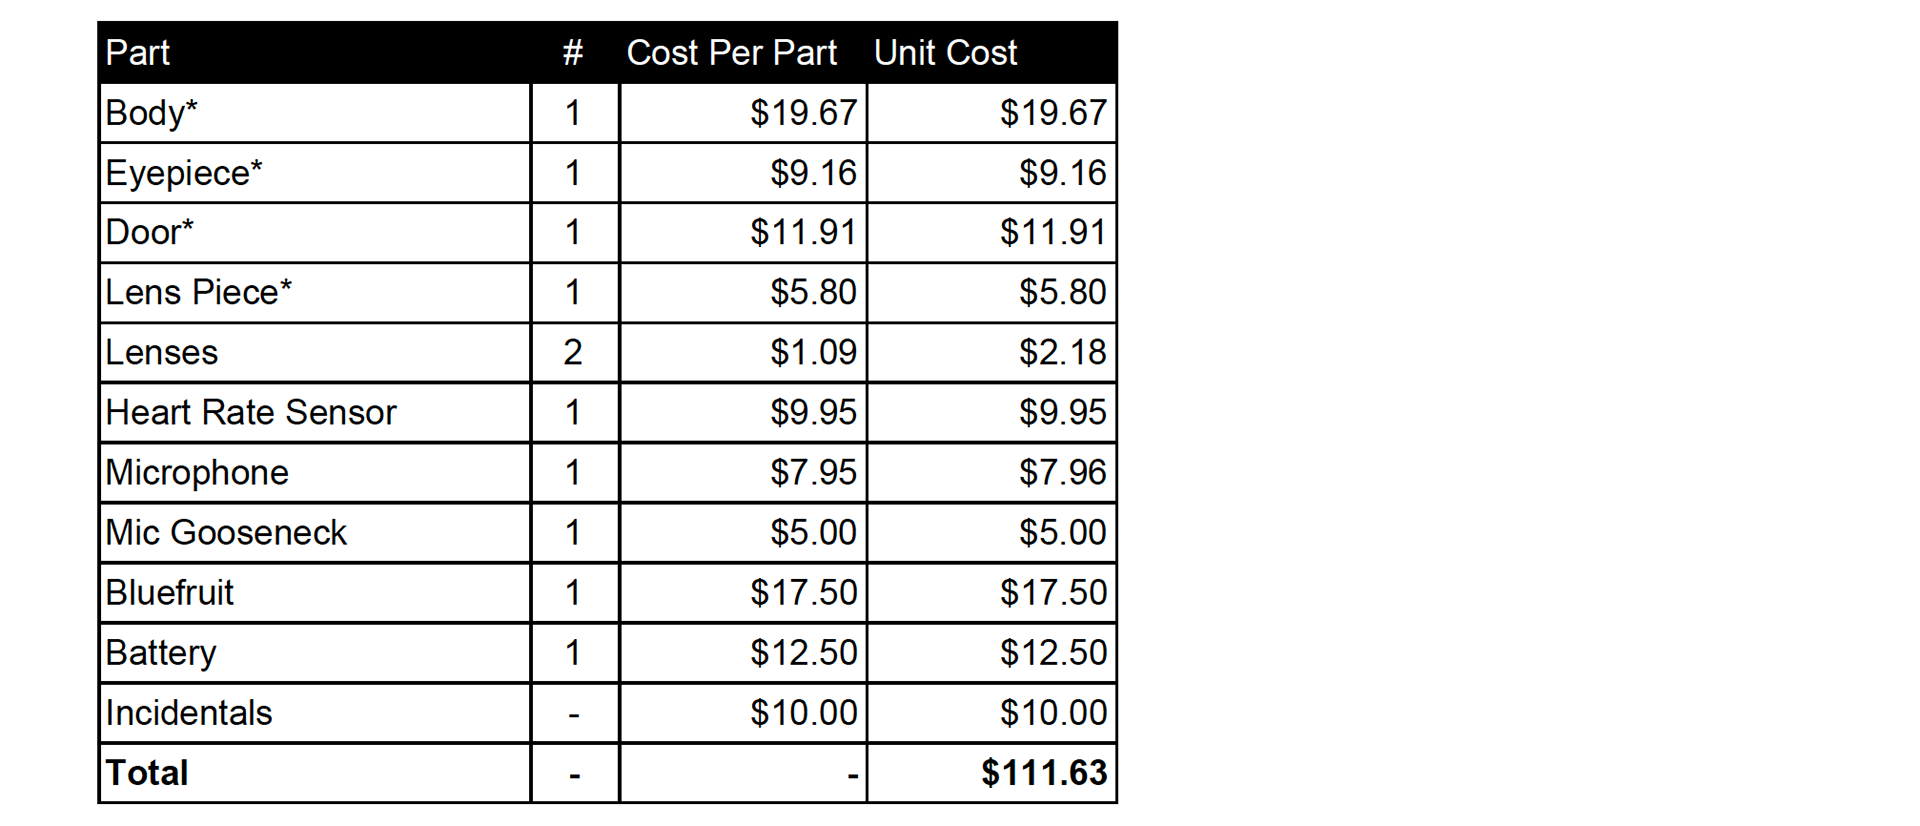
Unit Cost
Vision for Final Design
The design goal for the headset is to be sleek with sharp angles. The headset should be fully self-contained without any loose wires or exposed electronics. The aim is to have a classroom ready product with minimal set-up and maintenance required.